
Comment réparer un couteau de cuisine japonais ébréché
Votre couteau a accidentellement heurté un os? Un membre de votre famille a-t-il pensé que c'était le meilleur outil pour ouvrir une noix de coco? Cette tige de citronnelle était-elle juste un peu plus coriace que prévu?
Votre couteau bien-aimé est ébréché. Que faire maintenant?
Respirez profondément. Prenez une bière, si c'est votre truc. Les éclats arrivent, et nous sommes là pour vous aider à les réparer! Vous pouvez regarder cette vidéo de mon collègue Naoto ou lire la suite si vous préférez la version texte.
Comment enlever une entaille d'un couteau de cuisine japonais
La première étape consiste à éliminer les entailles. Commencez par marquer la quantité d'acier que vous devez meuler avec un marqueur. Puisque vous allez enlever beaucoup d'acier, vous risquez de meuler votre lame de manière inégale, ce qui peut altérer le profil de votre couteau. Pour éviter cela, tracez une ligne épaisse le long du tranchant à l'aide d'un marqueur, jusqu'au sommet de l'entaille. Assurez-vous que la ligne correspond au profil original (courbure) du tranchant.
Maintenant, sortez votre pierre la plus grossière – une pierre à grain 220 de Knifewear est la meilleure, ou même une plaque diamantée. Pour cette première étape, vous allez tenir votre couteau à un angle beaucoup plus large que vous ne le feriez normalement lors de l'affûtage. Nous visons généralement un angle de 15º lorsque nous travaillons sur des couteaux japonais, mais dans ce cas, il est avantageux d'utiliser un angle de 30 à 45º, car cela permet d'éliminer plus rapidement le matériau indésirable. Vous n'avez pas besoin de vous soucier de garder le couteau très tranchant; pour l'instant, notre objectif est d'éliminer rapidement cette entaille.
Maintenant, mettez-vous au meulage! Vous pourriez avoir l'envie d'utiliser beaucoup de pression (c'est certainement mon cas quand je suis en colère contre un couteau ébréché), mais une pression douce est la clé ici. Laissez la pierre faire le travail. Visez environ 30 passages de chaque côté avant de retourner le couteau et de faire l'autre côté, en répétant ce processus jusqu'à ce que votre éclat ait complètement disparu. Assurez-vous de meuler toute la longueur de la lame de manière égale pour maintenir un profil constant, et vérifiez votre travail fréquemment. Comme ce processus est exigeant pour votre pierre, essayez d'utiliser toute la surface de la pierre de manière uniforme pour réduire l'usure.
 Avec suffisamment d'habileté et de patience, même les couteaux gravement endommagés peuvent être réparés!
Comment amincir le couteau après avoir enlevé un éclat
À ce stade, votre couteau sera un gros garçon. Il coupera peut-être encore un peu, mais il sera extrêmement désagréable à utiliser, ressemblant plus à une hache qu'à un couteau. Le processus de meulage aura enlevé une grande partie de l'acier du noyau exposé le long du tranchant, ce qui signifie que le tranchant très aiguisé pour lequel les couteaux japonais sont si réputés n'est tout simplement plus là. Pour résoudre ce problème, nous amincissons le couteau! C'est une partie vitale de l'aiguisage régulier des couteaux, ainsi que de la réparation des éclats; apprendre ce processus améliorera considérablement votre jeu d'aiguisage de couteaux.
Reprenez votre pierre à grain 220 et dressez-la soigneusement pour la rendre plate. C'est important ici car une grande partie de la surface de votre couteau entrera en contact avec votre pierre, et une pierre plate assure un meulage constant et un minimum de rayures indésirables.
Vous êtes prêt à partir! Posez le biseau de votre couteau à plat contre la pierre. L'objectif ici est d'enlever une partie de l'acier de revêtement le long des côtés pour exposer une partie de l'acier du noyau le long du bord. Tenez le couteau dans votre main dominante et appliquez une pression sur le biseau à l'aide de votre index et de votre majeur avec votre autre main. Le biseau doit reposer à plat contre la pierre, mais essayez de l'incliner légèrement vers le bord, de sorte que la pression soit concentrée là. Je trouve qu'appliquer une pression avec mes doigts plus près du bord aide.
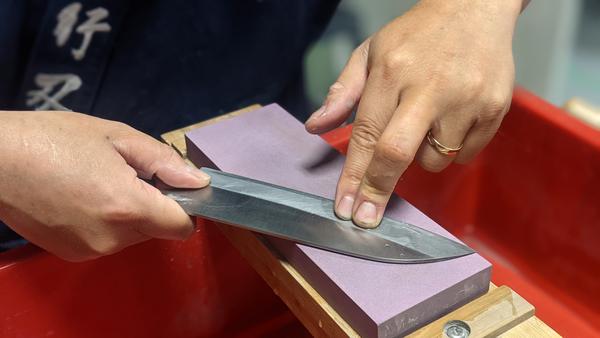
Contrairement à l'affûtage, l'amincissement est effectué à un angle bas défini par le biseau d'origine du couteau.
Commencez à déplacer votre couteau sur la pierre, en ajustant la position du couteau pour enlever uniformément l'acier des côtés sur toute la longueur du couteau. Gardez un œil sur votre ligne de revêtement, car vous voulez viser une quantité égale d'acier du noyau exposé sur toute la longueur de la lame. Je vais être honnête: cette partie demande un peu d'huile de coude! Mettez quelque chose de la chaîne YouTube de Knifewear pour vous divertir et gardez des collations à portée de main pour vous motiver. Continuez à travailler jusqu'à ce que vous voyiez la ligne de meulage, ou «route de la lame», due à l'élimination de l'éclat, disparaître.
Lorsque vous pensez que votre couteau a retrouvé son épaisseur d'origine, affûtez-le et testez-le sur du papier. Nous avons encore quelques étapes à suivre, mais c'est un excellent point pour vérifier votre travail. Vous recherchez tout éclat résiduel que vous auriez pu manquer ou des endroits sur la lame qui semblent encore un peu épais. Ne vous inquiétez pas si le tranchant semble rugueux, vous vous en occuperez bientôt!
Polir le biseau de votre couteau
Une fois que vous avez suffisamment aminci votre couteau, il aura probablement l'air un peu bancal. La pierre grossière qui a fait la majeure partie du travail laissera beaucoup de rayures. Pour le rendre à nouveau joli, répétez l'étape précédente en tenant le biseau à plat sur la pierre, mais cette fois utilisez des grains plus fins, comme vous le feriez lors d'un affûtage régulier (assurez-vous d'aplanir également ces pierres). Je trouve que pour cette application, les pierres plus tendres fonctionnent un peu mieux car la boue qu'elles créent assure une finition plus uniforme. Vous pouvez jouer avec différents grains, mais j'aime utiliser une succession de 1000 et 2000, en terminant par une 4000 pour polir l'acier du noyau à un niveau de brillance plus élevé. Il y a beaucoup de place pour expérimenter ici – vous pouvez incorporer des tampons de polissage, du papier de verre à grain fin ou de l'oxyde de chrome pour redonner au couteau sa finition d'origine. Ce processus demande un peu de patience, mais vous serez récompensé par un magnifique couteau!

Différentes pierres donneront des finitions différentes. De gauche à droite : grain 220, grain 1 000, grain 4 000.
Aiguiser le tranchant
La partie la plus satisfaisante! Après tout ce travail, l'affûtage du tranchant sera un jeu d'enfant, et la netteté de votre couteau vous surprendra. Si vous êtes déjà familier avec l'affûtage des couteaux japonais, cette partie ne devrait pas vous réserver de surprises.
Si vous craignez de nouveau d'ébrécher le couteau, vous pouvez choisir d'aiguiser à un angle différent de celui auquel vous êtes habitué. Alors que la plupart des couteaux de cuisine japonais sont aiguisés à 15°, un angle de 20° pourrait mieux vous convenir car il rendra le tranchant plus robuste et plus résistant aux chocs. En suivant la routine habituelle de 1000 et 4000 (et au-delà, si c'est votre truc!), aiguisez le tranchant. Soyez délicat ici; votre couteau nouvellement aminci n'aura pas besoin de beaucoup d'aide pour devenir très tranchant à ce stade. Si vous voulez un aperçu complet du processus d'affûtage, consultez ce blog.
Maintenant, coupez une tomate pour tester votre couteau fraîchement réparé. De rien!
Si vous souhaitez en savoir plus, consultez ces articles, ou rendez-vous sur notre playlist d'affûtage sur YouTube.


