How to Thin Your Japanese Kitchen Knives on Whetstones (And Why You Should!)
Thinning your knife, or “hot-rodding” as we call it at Knifewear, is a crucial part of sharpening a well-made knife. What is “hot-rodding”? It isn’t ripping your car up and down the main street of your hometown. When we say “hot-rodding” at Knifewear, we’re talking about the process of sharpening your knife’s primary bevel to thin it and bring back a stunning finish. While many folks simply just remove steel at the edge, it’s essential to consider the whole knife when sharpening. When we hot-rod, we reshape the geometry of the blade, exposing more of the knife’s core steel (the part that holds an edge) and allowing the knife to cut like it did out of the box. If you simply sharpen the edge over and over, you’ll end up with a very thick knife that won’t cut nicely.
If you plan to sharpen your Japanese knives yourself, this is an essential part of the process. This may seem a little complicated, but I’m going to break it down into basic steps so you can understand exactly what I’m talking about, and how to do it. Here’s some simple terminology to get started with:
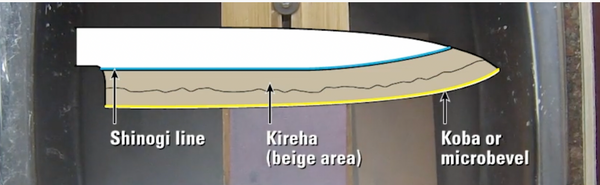
Shinogi Line: Where the primary bevel of the knife starts
Kireha: Primary bevel of the knife (the part you hot rod)
Koba: Mirco or Secondary bevel, the sharpened edge of the knife. (sometimes called a blade road)
It is good practice to regularly thin your knife. If not every time you sharpen it, every second or third sharpening for sure. The longer you go without thinning, the longer it will take when you finally do it, and the more you’ll be cursing your past self. Like any good tool, your knife will benefit from regular maintenance.
Like I said, the more you sharpen a knife on the Koba or secondary bevel, the thicker it is going to become. The thicker it gets, the more often you’ll need to sharpen it. A thicker knife will also wedge through dense vegetables, making it feel blunt, and defeating the purpose of having a good knife. Laying your knife flat against your stone, on the Kireha or primary bevel and grinding away enough steel, will prevent this. Not all Japanese knives are going to have a defined Shinogi line, but for the purposes of this explanation, we are working with one that does.

has been thinned properly. Notice the different amounts of exposed core steel?
Starting on the 220 grit stone, you will grind away the Kireha until the previous Koba disappears, then repeat on the opposite side. Lay the knife flat on the stone, then apply even pressure on the Kireha to “rock” the knife up onto the bevel. Gently run the knife back and forth along the length of the stone, adding water regularly. Check the bevel often to ensure you are grinding the entire thickness of the Kireha, and be sure to remove the original Koba along the entire length of the knife.
 Unlike sharpening, hot-rodding is done at a low angle set by the knife's original bevel.
This is going to leave you with some deep scratches on the surface, so you’ll want to repeat the process on the 1000 grit until you have polished out all the rough scratching from the previous stone. This will give you a smoother, foggy-looking finish, and that’s really all there is to it! If you’re particular about aesthetics you can give the Kireha a “Kasumi” finish with a 4000 grit stone, applying slightly more pressure towards the edge. The two steels will polish differently, giving a gorgeous contrast between the cladding steel and core steel. This also helps the core steel oxidize more slowly, if your knife is made from high carbon steel. That said, some folks will call it a day on 1,000, and even claim the slightly rougher surface releases food from the blade more effectively.

Different stones will give you different finishes. From left to right: 220 grit, 1,000 grit, 4,000 grit.
Your first thinning may not look perfect, and that’s totally fine. It’s mostly a functional difference. With time and practice, your finishes will improve, and you can even go down the rabbit hole of using different stones to achieve different polishes. Once you’ve completed this process, you can sharpen the koba. You can check out our blog and video on basic knife sharpening techniques here. If you ever have questions or need help, don’t hesitate to get in touch!


